
DIY Roman Shade (No Sew- original post)

The plan…
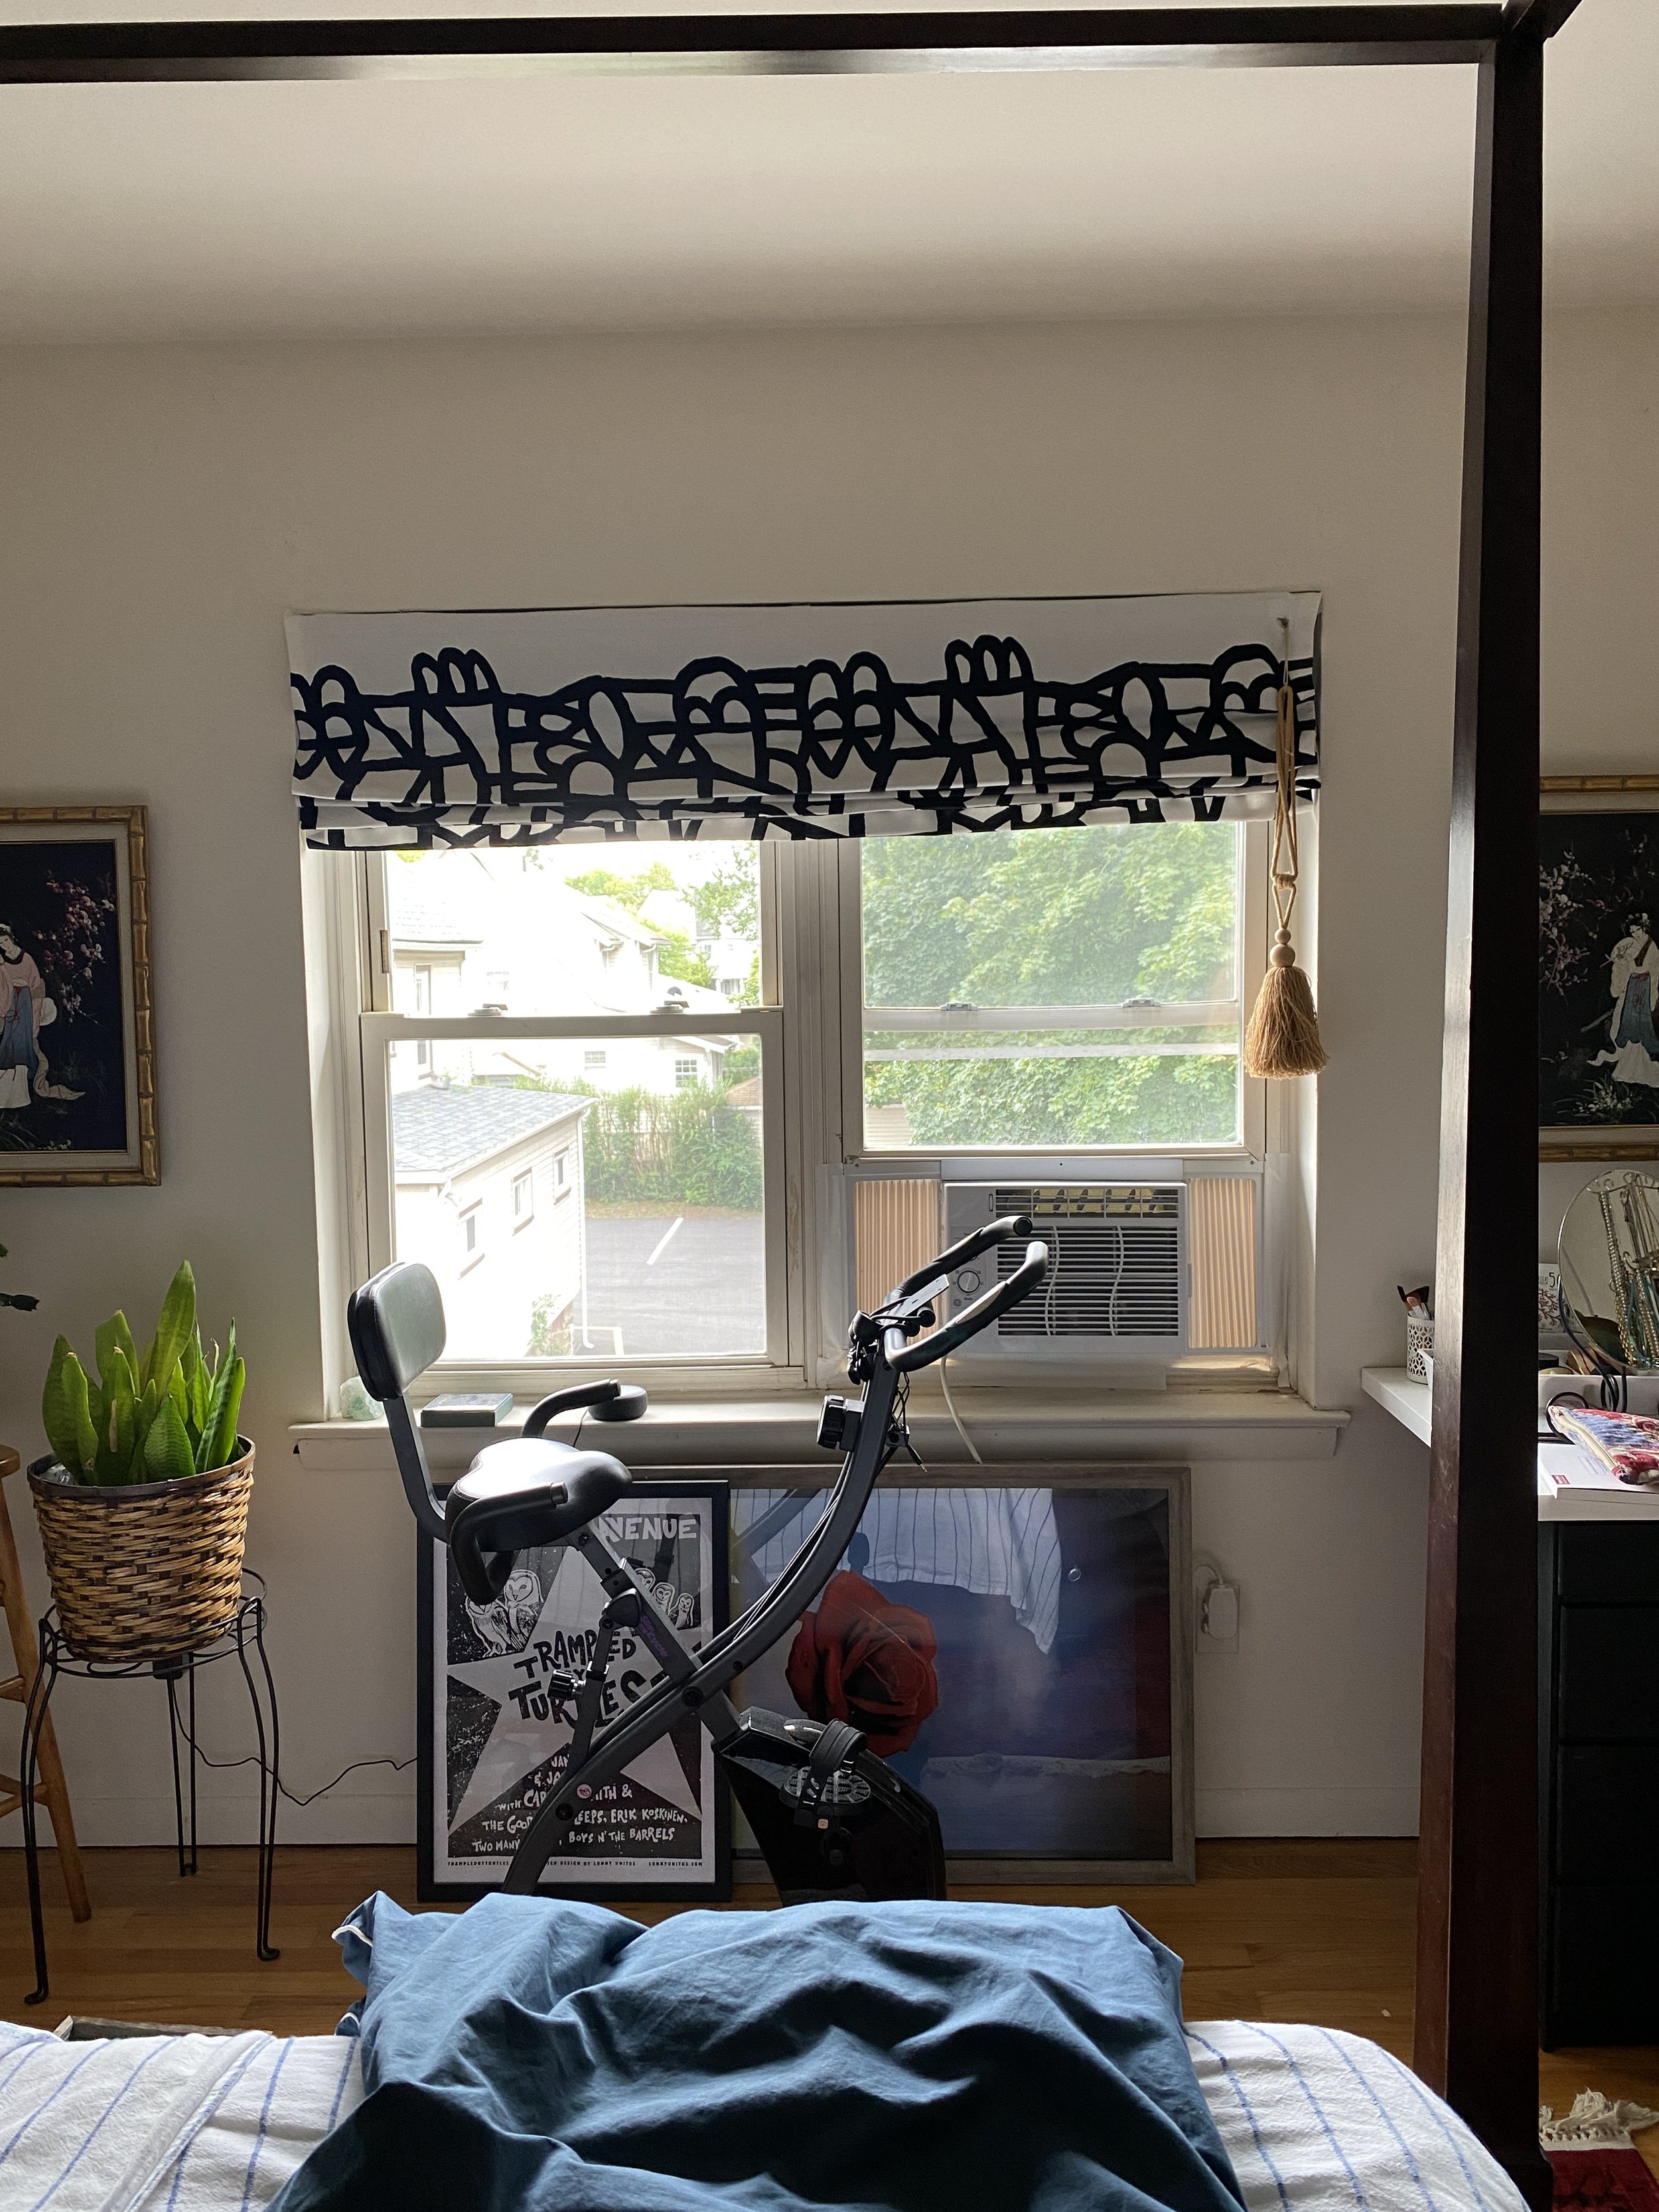
I had a vision here for this window covering of something cool, modern and bold. I also wanted to switch to a roman shade type covering because I could use the few inches I’d gain by eliminating the curtains since opening my “in bedroom gym” ;P… and it would feel more open. Roman shades and drapes don’t have to be either/or, they look gorgeous together and I often recommend a layered window, but here- it was more about the added space.
While I love helping clients find beautiful custom treatments for their windows- and am happy to show you options in your desired investment range- this was a fun project to take on… I love an opp to try a diy! And given that I’m in a rental and unsure how long I’ll stay, I was looking for a cost effective solution. (And a quick one since I'm an instant gratification kinda diy-er)
*This was technically the 4th time I tried this DIY, I have 3 others on my large Living Room window.
I’ve had my eye on this bold material from Ikea for a couple of years now and it fit perfectly into my moodboard for my bedroom update… more on that later. WINK.
This was a barely-there-budget project because the fabric only cost me $12 and I already had the blinds. (For reference, when I did the smaller sets of shades they were about $10 a piece for new blinds like these) It was my first time using corded blinds for this diy, but they worked just as easily as the cordless ones. This was also the largest at 64” wide!
To start, decide how many folds you want on your shade. Here, I opted for 6 folds.
Tip on choosing your folds: With less folds I find that when they are drawn up the top feels more full- because essentially, your folds will be larger since there's more fabric between them. Also take into consideration the weight of your fabric. If it's a heavier fabric, you may want more folds so that the weight is supported since it will be adhered to more slats.
Then decide where those folds will be in order to be evenly spaced and mark these slats. Here, I had 62 slats, so I marked every 10th slat as this would be where the fold will lay. (62 slats divided by 6 folds= close enough to 10 for me)
If you’re wondering about the math on this one, the bottom fold was slightly off, but unnoticeable
Keep in mind how you’re marking these and if you’ll see through your fabric when you glue it to the slats (you can mark one above or below the one you want to keep to be sure there are no marks to see)
This is the first time I did this while they were hanging (you can spread the blinds out and do it on the floor also- if you’re using cordless blinds, they’ll want to close so use a weight on the bottom bar to hold them open to your window height)

snip, snip, snip.
be sure not to cut the strings, you’ll still use them to control the shade.
Now, cut the slats that you won’t be keeping.
Again, this is the first time I did this while they were hanging, you can also spread the blinds out and cut them on the floor
Be careful not to cut any of the strings… you’ll need these to guide the slats up and down (If you happen to cut them though, you can do surgery! Don’t think it’s all over! You should be able to tie, sew or hot glue them in a way that will support the slat)
I find it easier to snip from the front of the blind to the hole that the strings go through, to open it up and then tear the blind OR if your scissor skills are on point- keep the strings to the side with one hand and cut front to back of the slat, through the hole to free the strings (the second option is a little faster, but gives me heart palpitations)
Are you following?? I hope I’m making sense… You can watch the video on this DIY Roman Shade that I made on TikTok HERE
Determine the size of fabric you’ll need for your window
Using the blinds as a guide, mark the width all the way down the length of your fabric. By using the header of the blinds (the widest part) you'll ensure that each slat is fully covered. You can double check this measurement against the width of your window to make sure you don't go too wide
The length is found by measuring the height of your window. As always measure twice, cut once, but for sure on the length! If you plan on using these to close, you don't want them too short
Prep the fabric
Sew or heat bond the edges of your fabric to create a nice crisp edge. I can’t sew a button (yet!), so for me, THIS is my go to
Also, I cheated here since the width of this fabric happened to match the length on my window. I left the "side" edges (not the cut edge) as is- they were adhered to the top header bar and bottom bar, and because those are wrapped around- you don't even see them! I always make sure to have a crisp edge on the sides because those make it feel very tailored and fancy

Here I’m stretching it all out to the height of my window and so that the strings are taut. This is how it will look on the window in the closed position- you want to make sure it’s not too short or you’ll have a lot of light coming through. And it’ll look like your window’s wearing high waters. (is “high waters” even a saying anymore?? is it so obvious I’m from the 1900s?)
Attach your fabric
Start with the fabric print side (or the side that will face you when hung) down
Lay the opened blinds down on top of the fabric- make sure the blinds are facing the same way (the side that will face you when hung should be down)
Gently pull down the open blinds so that they are stretched out completely **use a weight on the bottom bar for cordless, they'll try and close up on you
Ensure that your strings are all lined up straight (this is where one of mine went wonky... I'll show in my highlights) They should be parallel to the sides of your shade all the way down
Starting with the top bar, add fabric glue (I find this one works best), smear it with your finger so that there are no visible glue marks, and then adhere the fabric
Wrap the fabric up over the top by about a ¼” to hide the seam or edge
Work your way down adding fabric glue to the rounded side of each slat, smear it and flip it down to the fabric **Be sure to leave the strings free from glue!! This will allow the shade to go up and down
Do the same for the bottom bar, making sure to wrap extra fabric to cover the bottom of the bar so there’s no visible “seam” when the shade is up
Let this dry (I wait for at least a couple hours)
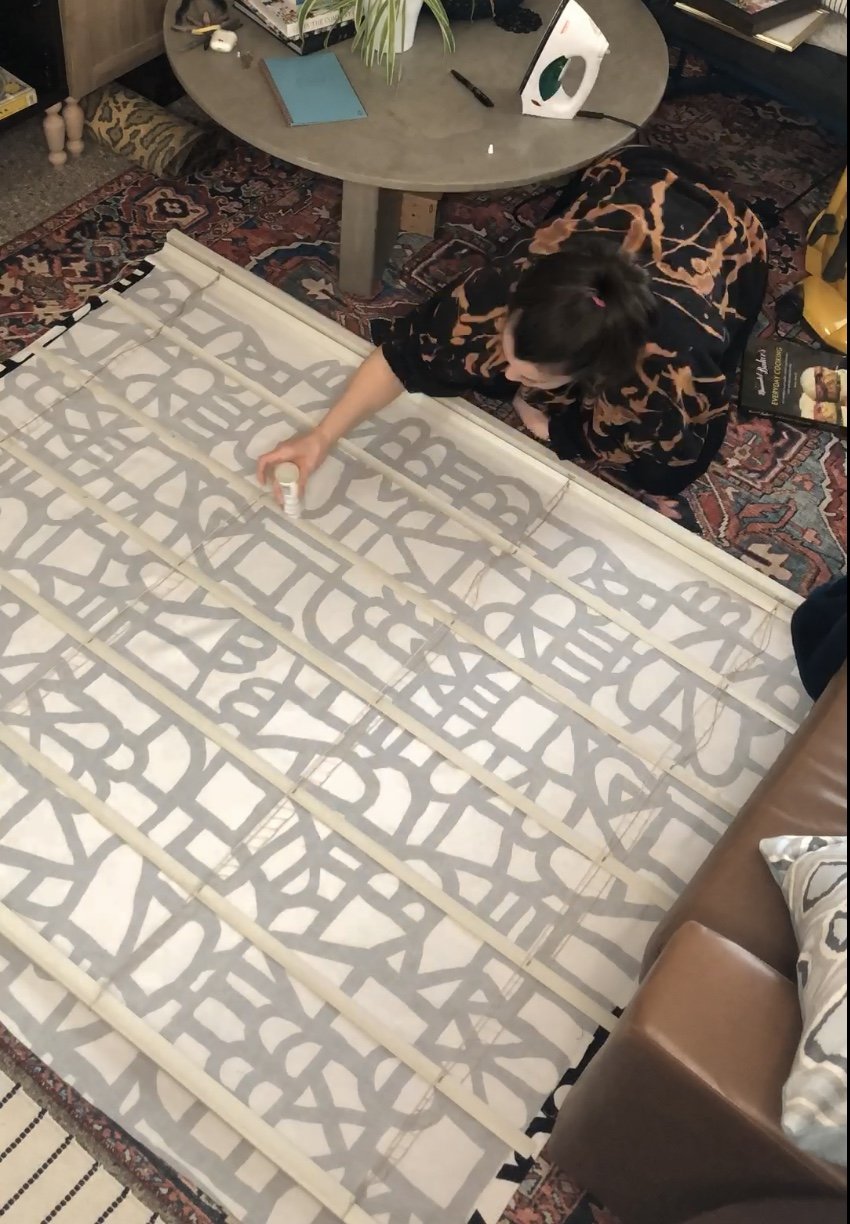
I went blind by blind with glue- just flipped it up, added the glue with gaps for the strings, lightly spread the glue where needed and then turned it back over and pushed it down onto the fabric.
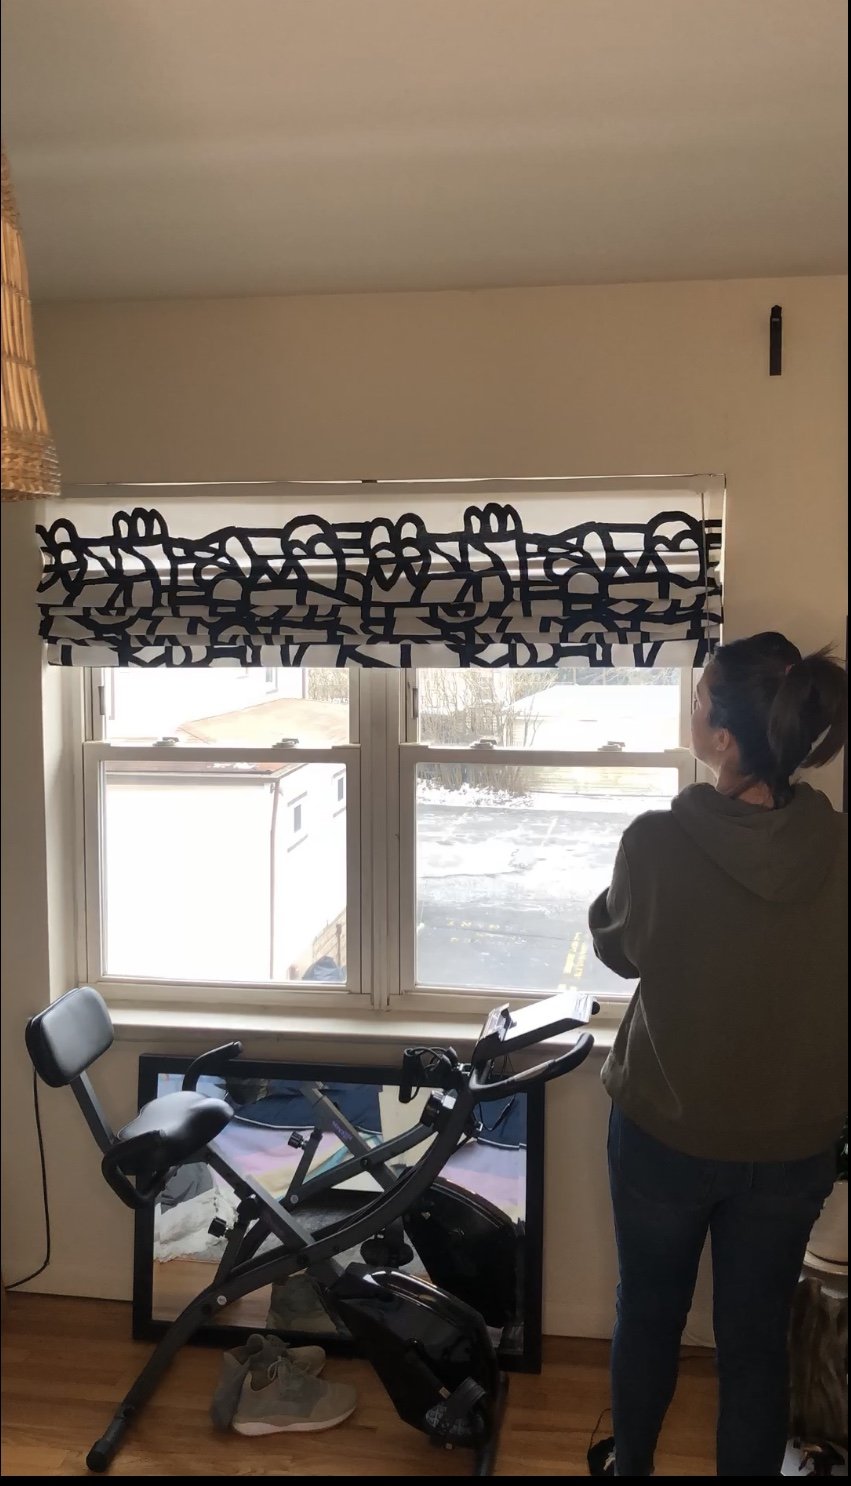
Hang your shade
Use the hardware that comes with the blind to pop it up in the window as instructed
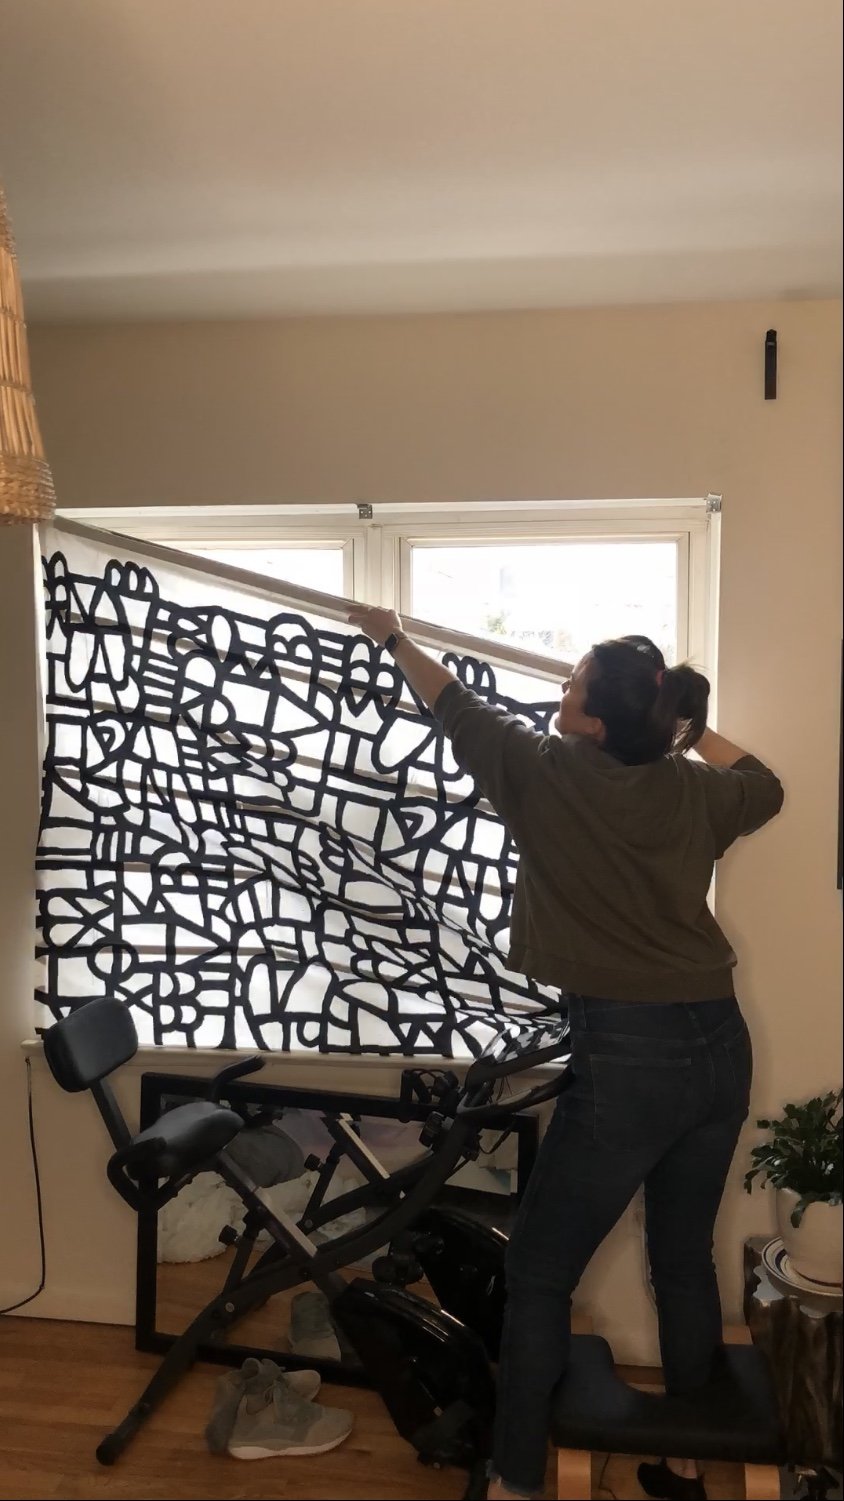
Regular blinds like these are so easy to clip in… and even if you have to install the brackets, it’s a pretty straight forward install. These corded ones were heavier (since they’re also from the 1900s I’d bet), but the cordless ones are quite light, making them a breeze to hang.
A Few Tips:
For this corded shade I doubled up the fabric with heat bond in a small (1.5” x 1.5”) square right in front of the spot where the cord came out and made a small cut in it so that the cord could be pulled through- I’ll then wrap this and add a tassel to make it pretty
Make sure you don’t cut your strings! If you do, you can sew them, but really try not to…
Make sure that your strings are lined up straight before you glue the fabric down… I didn’t do this on one shade and you can see the cords going a bit diagonal when the light shines through
Leave the strings free from the glue! I left about a 1" gap for them to pass
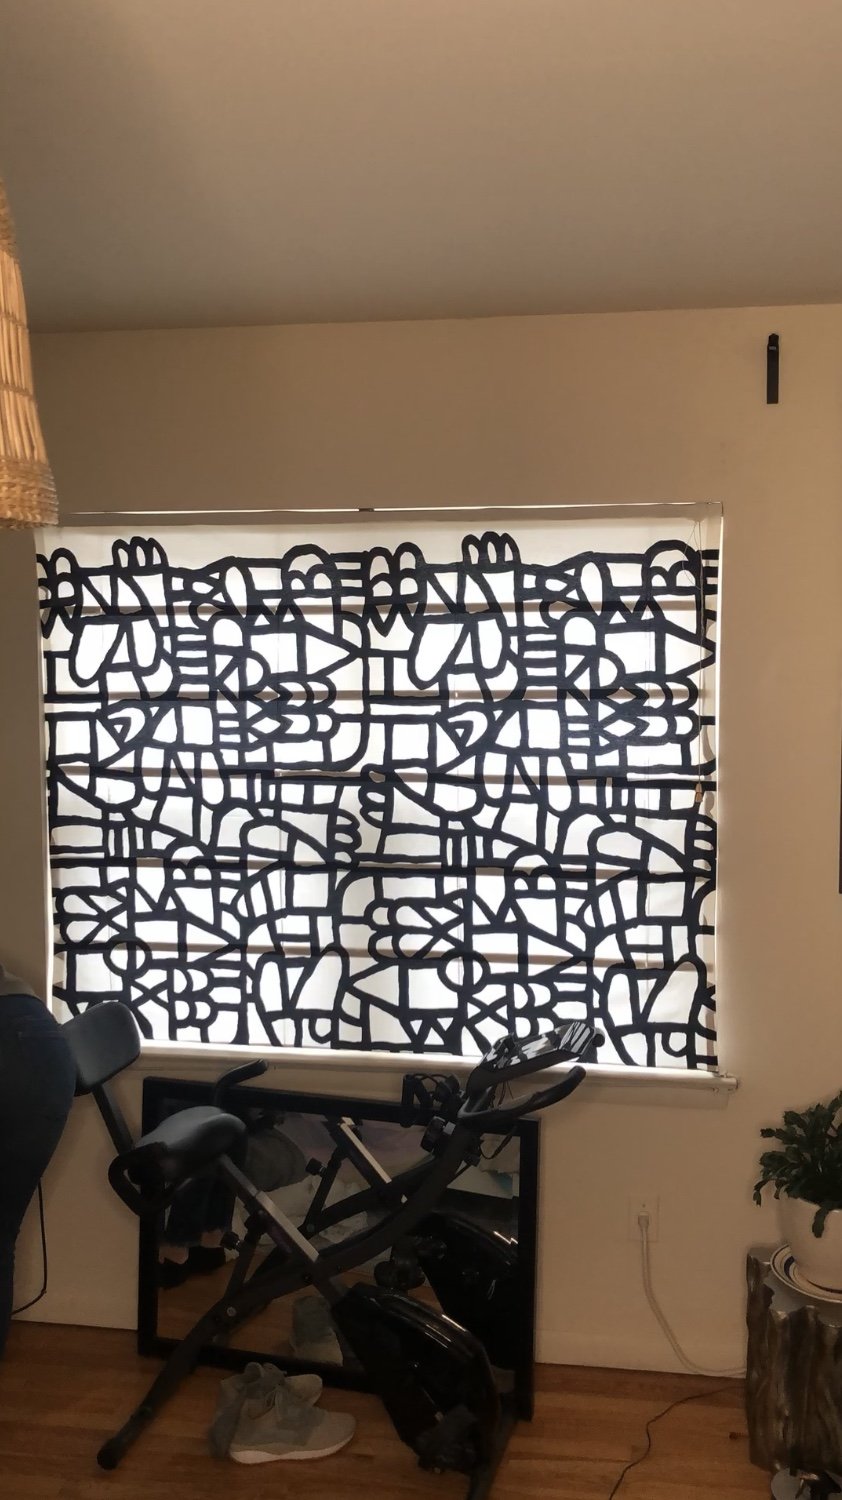
I broke this down in bite sized pieces which makes it seem a little long, but I’d say this DIY is a 5.5/10 for involvement. It’s particular, but you don’t need a lot of tools and it doesn’t take a ton of time for the level of wow factor
What about the backside??
This is such a good question I've been getting! I did think about it, but honestly for me, it wasn't a big concern. However, I totally understand wanting to make sure the windows don't look crazy from the outside lol (I'll update with a photo!)
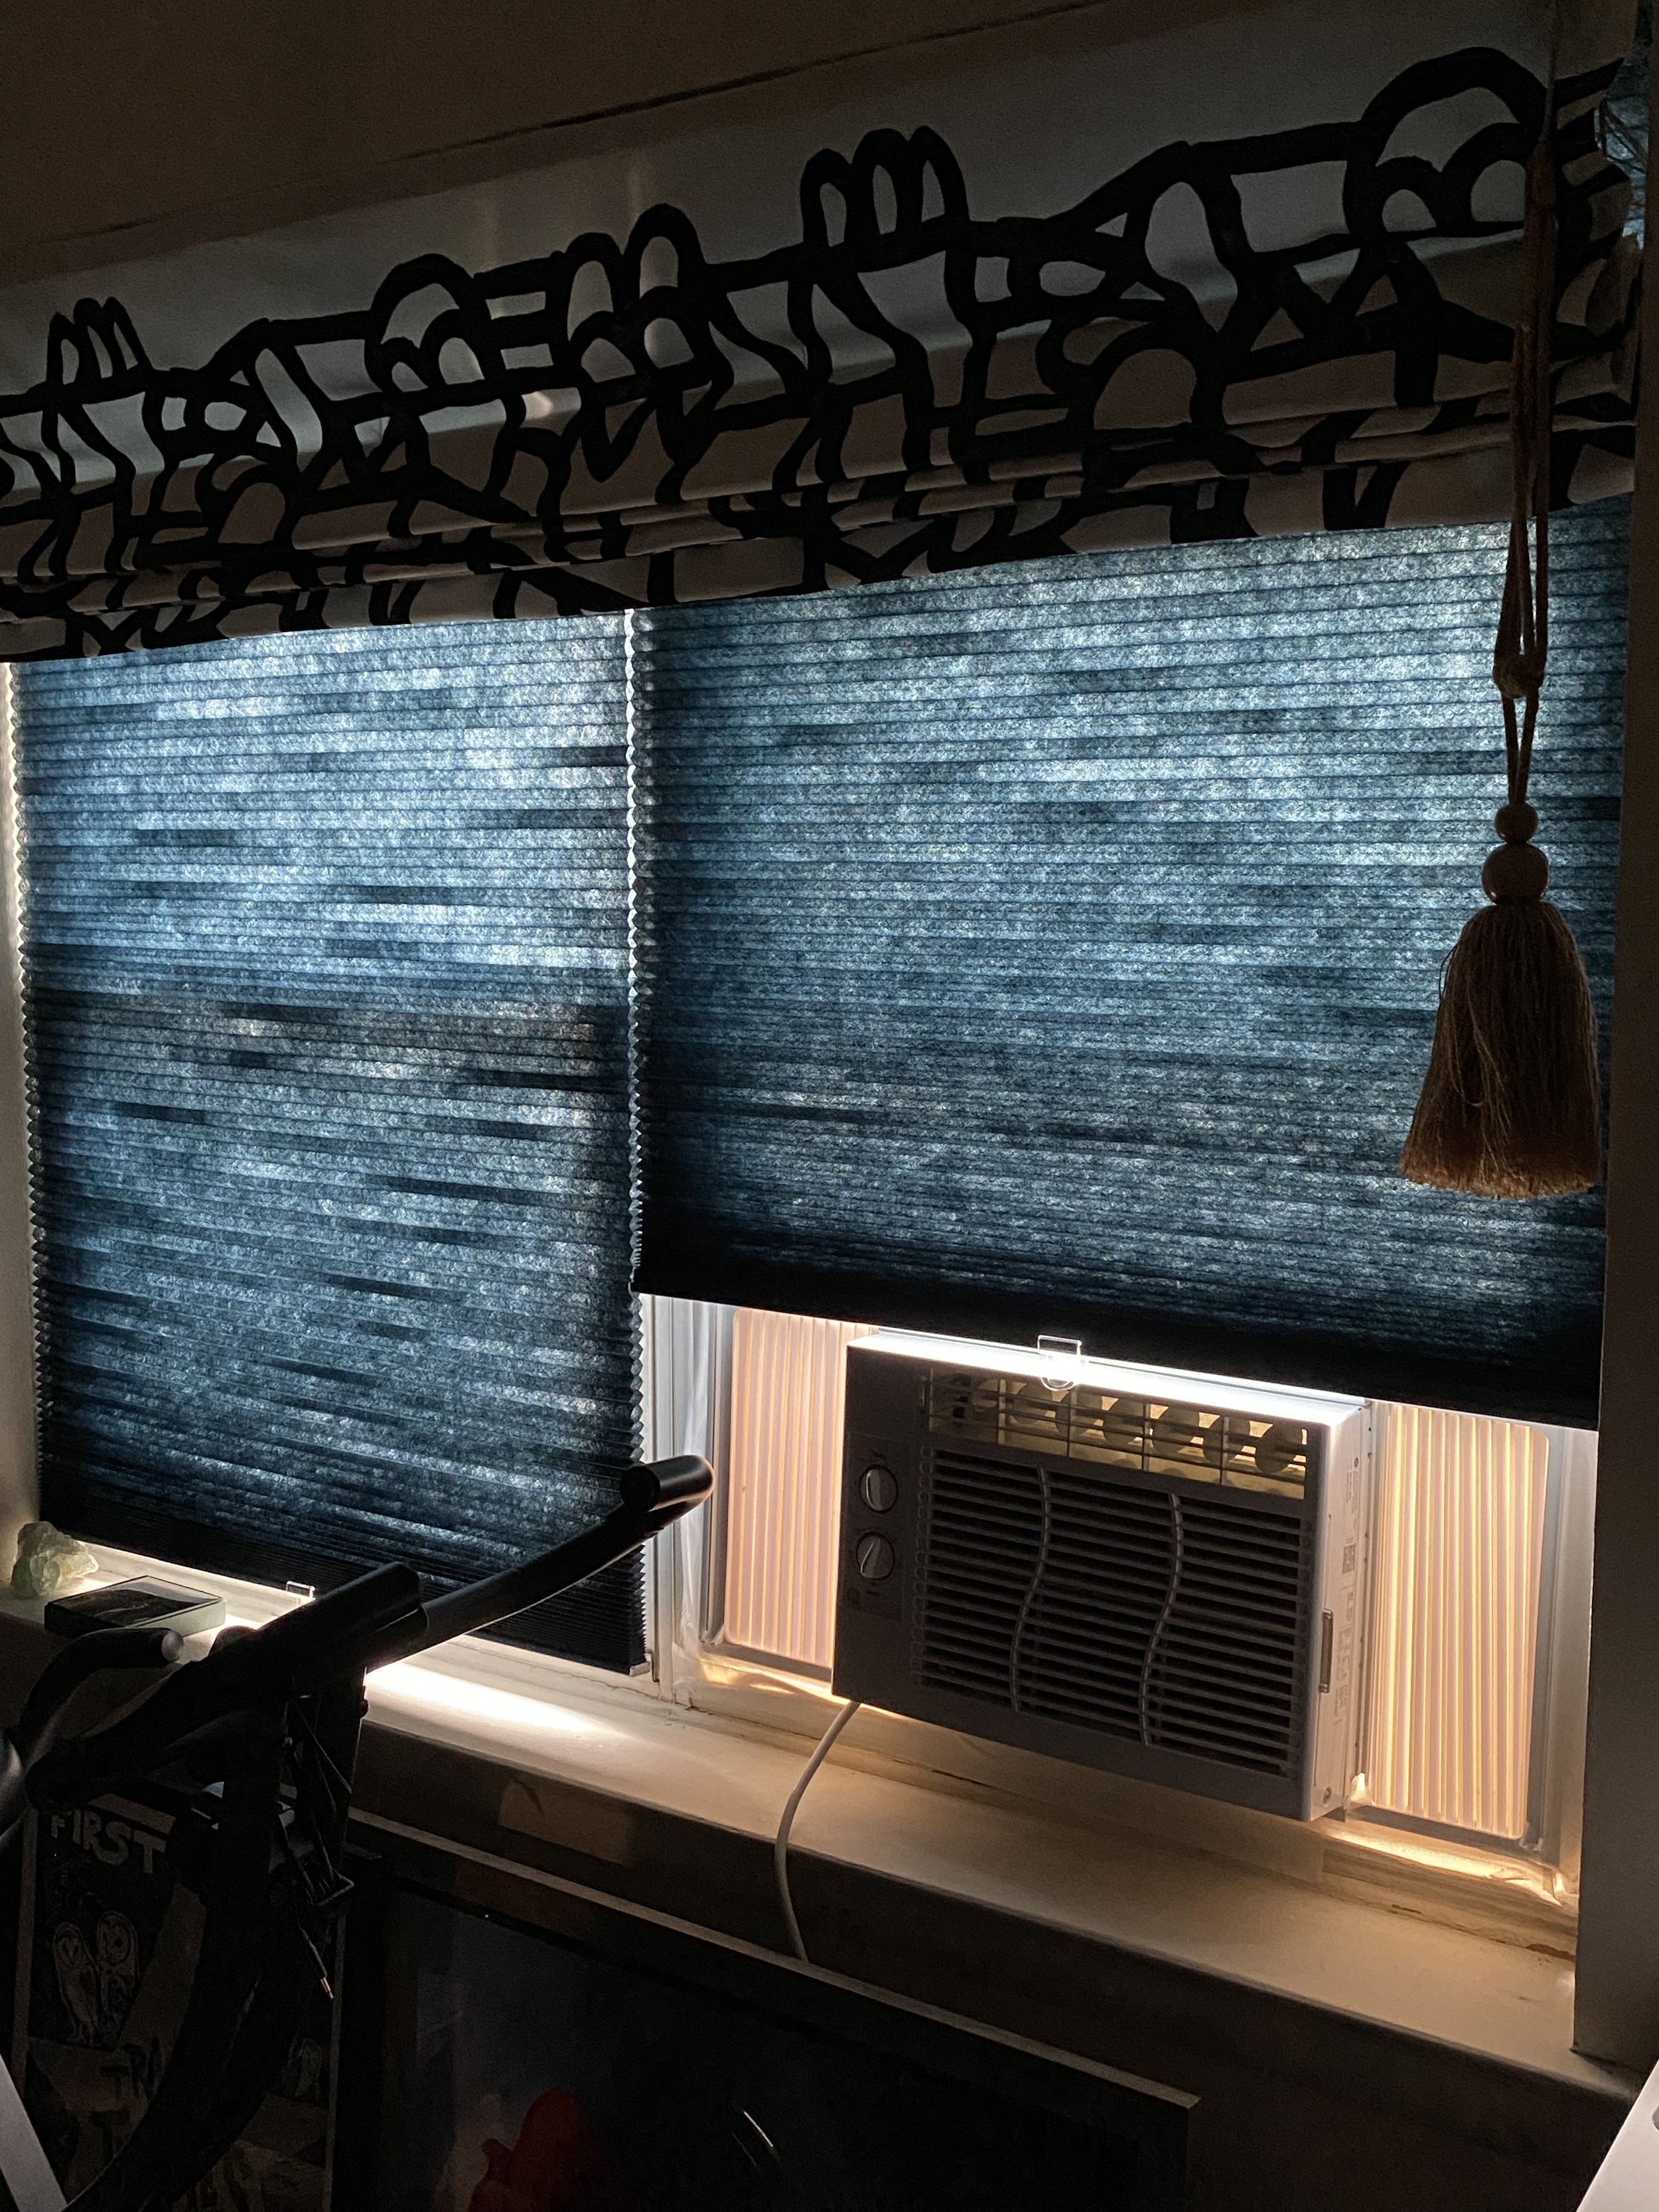
The linen set that I have, I specifically wanted to keep as light filtering so that my plants stay happy without having to keep them open all day- which they have! I think because they are so light in color (plus the blinds are white), and I'm on the second floor it's not very noticeable from the outside. I have seen these made with a liner behind, so I'm going to try that next and I'll do a follow up post. Then, there would be fabric on both sides of the blinds. The main thought here is to make sure that the weight of both pieces of fabric doesn't become too heavy for the blinds- so I'm thinking maybe more folds if you add a liner... experiment on the way!
Update:
I originally wrote the post and made this no sew “Roman Shade” using blinds for my bedroom window in March of 2021. The shade still functions, but I opted for adding Ikea room darkening cellular shades mounted inside the window behind it. They tuck away nicely and allow me to easily pull them up and down everyday. So now, the shade stays pretty, in the up position, like this:
I’ve actually been dreaming up another makeover on this window… stay tuned.
On durability: The shades in my living room have been up for over 3 years now and still work and look like new (with daily use). I think I’ll do an update post soon to show a little addition I did on those too :)
What do you think? Is this something you’d try? Thank you so much for reading!! If you decide to give it a go, I'm happy to offer any tips I have... reach out on IG or shoot me an email.
Happy Home-ing xx,
Kate